Thoroughly enjoyed this first look at paper bundles. Your instructions are so clear and gentle. Thank you too for the list of plant materials and the written notes to go along with the video. You are a wonderful GIFT to the heart during this crazy upside down virus time.
Simmered 4 bundles in my pot and now I am going to let them soak over night… some bundles seem a bit darker then others and my copy paper bundle looks pretty trashed, but we will see in the morning how they did. Christmas morning but with zero expectations! LOL Grand experiment.
Yay! No expectations but enjoying the process of unwrapping is always a good approach. You’ll learn a lot no matter what results you get, and any pale prints we will work over later in the course.
Did I remember seeing somewhere that when you’re cooking the dye bundles in the dye bath, that you should be careful about the fumes, if there is iron in it? I used a rusty tin for one of my bundles.
Yes, I always advise cooking outside if possible or at least opening a window or turning the exhaust fan on, and having a lid on your dyepot. The iron isn’t exactly going to evaporate and spread through the air, but always better to be overcautious about what we breath in.
I made 3 bundles on slightly rusty tins and the the result is amazing! I used artist quality watercolorpaper so there was no dammage on the paper after the dyebath. I used turmeric roots to dye the paper. I love how you use the things most of us have lying around in the kitchen. This makes it so easy to start. Now i can’t wait to start with the rollers fabric bundles ?. So happy i joined the iso dye club. ❤️❤️❤️❤️❤️
Four bundles are simmering in my pot together with onion peel, rusty pieces of iron and some dried marigold. Since it’s spring here in Sweden I thought I better ”hot up” the dye if the plants are a bit week. Used good quality paper but also printer paper which I haven’t used before so it’ll be fun to see how that will turn out. Hate the wait before I can unbundle though ?
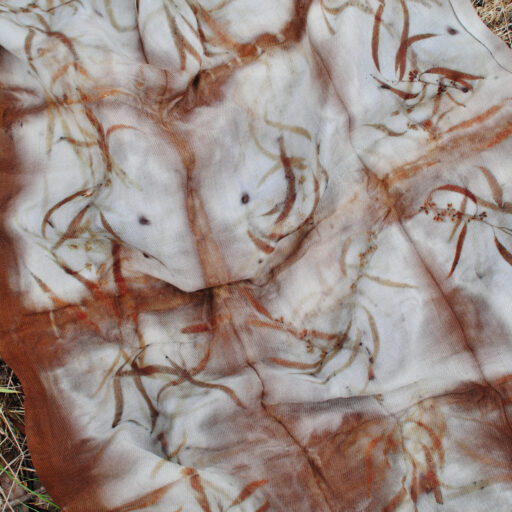
I used cheap acrylic art paper & they turned out really well. I was delighted with the deep green from the iron with the onion skin. I have been saving them up but hadn’t used them until now. The cotton fabric piece is lovely. Again, thankyou.
I literally want to go an open a can just to have one (our recycling was picked up today). Does it matter what kind of can? Some other questions: Would the jar bundle have been influenced by the iron can in the dye bath? Would you still get the same results if there was no iron in the bath at all? Could you wrap more paper around the can (creating a number of layers)? Or is it important to have it sitting against the can?
You will find that different cans give slightly different results (some rust easily, others not), but I don’t think there is a way to predict this, so just experiment with what you have. Yes, the jar bundle would have been influenced by the presence of rust, at least on the outside where it was exposed to the dyebath. The inside should be unaffected, except when you are using fabric with a loose weave that the dye and iron can penetrate. Yes, you can create several layers around the can. It’s fun to do this, as you will notice different effects from the paper against the can compared to further out.
So I’m still having so much fun experimenting with this a week later. I live in Singapore, and I have no idea about most of the plants that I have access to. I am literally going out on foraging expeditions with my mask and a canvas bag. I’m starting to find some plants that have good effects- it’s just remembering where I found them. Because I’m having to be so experimental with the plants, I’ve got a bit desperate and have been wrapping strips of paper and cloth around anything…I actually had some decent results with wine corks. I wonder if the tannins from the wine comes out? I put them inside the cans in the pot so that they are submerged. I also put a nail in each end… Thank you so much for offering this course at various price points. I am loving doing this and have a new pot on the stove each day, although for now I’ve just been adding more to the dye bath. I started out not very prepared.
I’m so excited by preparing my first eco print on paper and don’t have many onion shells, do you think seaweed can have the same effect !! …. a little funny I have more seaweed than onion shells ?
Hi Betina, unfortunately most seaweed doesn’t give colour. It can be great for shapes, but not for dye. Perhaps use some tumeric or other spices or some tea leaves to add extra colour – experiment with whatever you can find in your kitchen or your neighbourhood. And even a small amount of onion skins will give colour!
Can you use lengths of PVC pipe instead of glass jars? Its just that I can cut them conveniently to the right length to put inside my pot. Just trying to maximise my results.
Your video is wonderful and makes this process so easily accessible. I did 4 bundles yesterday, experimenting with different types of paper, soaking the paper in iron water first and not, dipping leaves in iron water first and not, boiling bundles and steaming bundles. The watercolor paper is student quality so it’s a bit fragile. I have Bristol paper that turned out really well. I’m boiling and steaming 4 more bundles today changing up some things that I learned after yesterday. This is such a magical process!
That’s wonderful Jamie, so glad you are enjoying it, and that you are taking the time to do systematic tests – it really is the best way to learn and to develop your personal style!
I am looking forward to trying the rusty can method. I love the darker results you have . I also use a slow cooker ( from the tip- shop) for a nice even simmer . Different results again from metal containers.
Hi Louise, thanks for such clear instructions. I’ve had a go and really interesting results. Better than I expected from my efforts, although not sure how much is resist and how much is dye. Can I ask, do you throw the remaining dye bath away and use a fresh one next time? Or, do you keep it in the pot and use it again next time? I’m unlikely to get to it again within a week, wondering how long the used dye bath is worth keeping if at all. Thanks, Tricia
Hi Tricia, there’s a few factors to consider. Was it a strong dye bath, or does it look like most of the dye has transferred to the paper? I only tend to save strong dye baths, although you can always add more dyestuff to an old dye bath, or even soak some bark etc in it while you are waiting to reuse it. Also, if it is hot where you are you might find that it grows mould quickly, whereas in cold weather you can store it for a week or two no problem. If you do decide to store it, do so in a plastic or glass container, not a dye pot – the acidity of the dye bath can erode the metal and eventually cause holes!
I experimented with friends awhile back with some lovely Kozo paper. We mordanted the paper with alum. I see here you don’t mordant the paper at all. I’ll have to give that a try. I am guessing the iron working in the pot helps give the prints. Any thoughts?
Me again Louise…I realize it’s the reaction between the iron and the tannin in the dye plants like onion skin and tea leaves which creates the prints…Just needed to say that… 🙂
Hi, yes here some of the iron has wicked into the bundle and helped create the prints, and of course transferred from the rusty can too. But you can get great prints on plain paper cooked in plain water too, depending on the paper you use and what it has been made and sized with by the manufacturers. In week 2 there is an example of this. Many brands of watercolour paper can give good results without any mordant, although you still may like to use alum to brighten or iron to darken.
Unfortunately not. Soda ash (cooked baking soda) is commonly used in natural dyeing for scouring (washing) fabric before dyeing, but is not actually a mordant. You can make a simple alum mordant by cutting up aluminium foil and putting a small amount in a jar, then half filling with vinegar. It takes much longer than the iron mordant though, about 3 months.
But as I said in another comment, some watercolour paper already contains alum, so just experiment with some different brands and see what results you get.
I did an experiment and I like the results. I used a sardine´s can also and it was not so good as the round one, but it worked. I probably could tie it differently, to get the right pressure. Anyway, that´s a new universe of possibilities! I posted the photos on Instagram, tagging the course and you.
I think the light ones are absolutely beautiful! I’m going to visit a local restaurant tomorrow and see if they’ll save me some onion skins and coffee grounds. I’ll also try to visit a scrap metal yard and get some small bits. I’ve asked neighbors for these things, but haven’t had any luck so far.
I love listening to you speak. You have the most soothing voice!
42 Comments
Thoroughly enjoyed this first look at paper bundles. Your instructions are so clear and gentle. Thank you too for the list of plant materials and the written notes to go along with the video. You are a wonderful GIFT to the heart during this crazy upside down virus time.
Thank you so much for such a beautiful comment, it really touched me. I am so glad that we get to use this time to connect over plant magic.
Simmered 4 bundles in my pot and now I am going to let them soak over night… some bundles seem a bit darker then others and my copy paper bundle looks pretty trashed, but we will see in the morning how they did. Christmas morning but with zero expectations! LOL Grand experiment.
Yay! No expectations but enjoying the process of unwrapping is always a good approach. You’ll learn a lot no matter what results you get, and any pale prints we will work over later in the course.
Did I remember seeing somewhere that when you’re cooking the dye bundles in the dye bath, that you should be careful about the fumes, if there is iron in it? I used a rusty tin for one of my bundles.
Yes, I always advise cooking outside if possible or at least opening a window or turning the exhaust fan on, and having a lid on your dyepot. The iron isn’t exactly going to evaporate and spread through the air, but always better to be overcautious about what we breath in.
Good call. Thank you!
I made 3 bundles on slightly rusty tins and the the result is amazing! I used artist quality watercolorpaper so there was no dammage on the paper after the dyebath. I used turmeric roots to dye the paper. I love how you use the things most of us have lying around in the kitchen. This makes it so easy to start. Now i can’t wait to start with the rollers fabric bundles ?. So happy i joined the iso dye club. ❤️❤️❤️❤️❤️
So glad you are enjoying it Jans, and I love the photos you have shared on
Instagram!!
Four bundles are simmering in my pot together with onion peel, rusty pieces of iron and some dried marigold. Since it’s spring here in Sweden I thought I better ”hot up” the dye if the plants are a bit week. Used good quality paper but also printer paper which I haven’t used before so it’ll be fun to see how that will turn out. Hate the wait before I can unbundle though ?
How wonderful! I look forward to seeing what the marigold does
I used cheap acrylic art paper & they turned out really well. I was delighted with the deep green from the iron with the onion skin. I have been saving them up but hadn’t used them until now. The cotton fabric piece is lovely.
Again, thankyou.
Oh that’s great. Sometimes random paper works so well. Yes, I’m in love with the olive green that iron plus onion skin makes!
I literally want to go an open a can just to have one (our recycling was picked up today). Does it matter what kind of can?
Some other questions:
Would the jar bundle have been influenced by the iron can in the dye bath? Would you still get the same results if there was no iron in the bath at all?
Could you wrap more paper around the can (creating a number of layers)? Or is it important to have it sitting against the can?
You will find that different cans give slightly different results (some rust easily, others not), but I don’t think there is a way to predict this, so just experiment with what you have.
Yes, the jar bundle would have been influenced by the presence of rust, at least on the outside where it was exposed to the dyebath. The inside should be unaffected, except when you are using fabric with a loose weave that the dye and iron can penetrate.
Yes, you can create several layers around the can. It’s fun to do this, as you will notice different effects from the paper against the can compared to further out.
So I’m still having so much fun experimenting with this a week later. I live in Singapore, and I have no idea about most of the plants that I have access to. I am literally going out on foraging expeditions with my mask and a canvas bag. I’m starting to find some plants that have good effects- it’s just remembering where I found them. Because I’m having to be so experimental with the plants, I’ve got a bit desperate and have been wrapping strips of paper and cloth around anything…I actually had some decent results with wine corks. I wonder if the tannins from the wine comes out? I put them inside the cans in the pot so that they are submerged. I also put a nail in each end…
Thank you so much for offering this course at various price points. I am loving doing this and have a new pot on the stove each day, although for now I’ve just been adding more to the dye bath. I started out not very prepared.
Oh, how wonderful that you are trying so many different plants! Experimentation so important – I love your use of the corks and nails. Keep playing!
I’m so excited by preparing my first eco print on paper and don’t have many onion shells, do you think seaweed can have the same effect !! …. a little funny I have more seaweed than onion shells ?
Hi Betina, unfortunately most seaweed doesn’t give colour. It can be great for shapes, but not for dye. Perhaps use some tumeric or other spices or some tea leaves to add extra colour – experiment with whatever you can find in your kitchen or your neighbourhood. And even a small amount of onion skins will give colour!
Can you use lengths of PVC pipe instead of glass jars? Its just that I can cut them conveniently to the right length to put inside my pot. Just trying to maximise my results.
Hi, I would personally not want to boil PVC pipes but I’m very cautious in my use of plastic.
I am finding lots of lichen and moss on my walks in the neighborhood. Will those give results?
I’ve had some lovely orange results from lichen before, so it is definitely worth trying!
Your video is wonderful and makes this process so easily accessible. I did 4 bundles yesterday, experimenting with different types of paper, soaking the paper in iron water first and not, dipping leaves in iron water first and not, boiling bundles and steaming bundles. The watercolor paper is student quality so it’s a bit fragile. I have Bristol paper that turned out really well. I’m boiling and steaming 4 more bundles today changing up some things that I learned after yesterday. This is such a magical process!
That’s wonderful Jamie, so glad you are enjoying it, and that you are taking the time to do systematic tests – it really is the best way to learn and to develop your personal style!
I am looking forward to trying the rusty can method. I love the darker results you have .
I also use a slow cooker ( from the tip- shop) for a nice even simmer . Different results again from metal containers.
Yes, the rusty cans really are magical. The slow cooker is a great idea!
Hi Louise, thanks for such clear instructions. I’ve had a go and really interesting results. Better than I expected from my efforts, although not sure how much is resist and how much is dye. Can I ask, do you throw the remaining dye bath away and use a fresh one next time? Or, do you keep it in the pot and use it again next time? I’m unlikely to get to it again within a week, wondering how long the used dye bath is worth keeping if at all. Thanks, Tricia
Hi Tricia, there’s a few factors to consider. Was it a strong dye bath, or does it look like most of the dye has transferred to the paper? I only tend to save strong dye baths, although you can always add more dyestuff to an old dye bath, or even soak some bark etc in it while you are waiting to reuse it. Also, if it is hot where you are you might find that it grows mould quickly, whereas in cold weather you can store it for a week or two no problem. If you do decide to store it, do so in a plastic or glass container, not a dye pot – the acidity of the dye bath can erode the metal and eventually cause holes!
Really helpful, thanks Louise. T
I experimented with friends awhile back with some lovely Kozo paper. We mordanted the paper with alum. I see here you don’t mordant the paper at all. I’ll have to give that a try. I am guessing the iron working in the pot helps give the prints. Any thoughts?
Me again Louise…I realize it’s the reaction between the iron and the tannin in the dye plants like onion skin and tea leaves which creates the prints…Just needed to say that…
🙂
Hi, yes here some of the iron has wicked into the bundle and helped create the prints, and of course transferred from the rusty can too. But you can get great prints on plain paper cooked in plain water too, depending on the paper you use and what it has been made and sized with by the manufacturers. In week 2 there is an example of this. Many brands of watercolour paper can give good results without any mordant, although you still may like to use alum to brighten or iron to darken.
Oh, and alum is sometimes used in the paper making process, which explains some of the good results we can get on plain paper.
Thanks Louise!
That would explain it!!
Paper is so fun to print on!!
Hi Louise,
Can you use baking soda instead of alum?
Thank you!
Unfortunately not. Soda ash (cooked baking soda) is commonly used in natural dyeing for scouring (washing) fabric before dyeing, but is not actually a mordant. You can make a simple alum mordant by cutting up aluminium foil and putting a small amount in a jar, then half filling with vinegar. It takes much longer than the iron mordant though, about 3 months.
But as I said in another comment, some watercolour paper already contains alum, so just experiment with some different brands and see what results you get.
I did an experiment and I like the results. I used a sardine´s can also and it was not so good as the round one, but it worked. I probably could tie it differently, to get the right pressure. Anyway, that´s a new universe of possibilities! I posted the photos on Instagram, tagging the course and you.
Oh, using a sardine can is a great idea. Could be really nice for fabric bundles! Thanks for sharing. Off to check out your Instagram post now…
I think the light ones are absolutely beautiful! I’m going to visit a local restaurant tomorrow and see if they’ll save me some onion skins and coffee grounds. I’ll also try to visit a scrap metal yard and get some small bits. I’ve asked neighbors for these things, but haven’t had any luck so far.
I love listening to you speak. You have the most soothing voice!
Aw thanks Deanna!